Create a tournament and open registration
How to create a tournament that players can register for: create the tournament page, add divisions, set up your registration settings, add any extra features you need (such as a DUPR requirement, DUPR gating, waivers, coupons or a waitlist) and, once you've reviewed all the details, turn registrations on.
Step-by-step
1Create the tournament
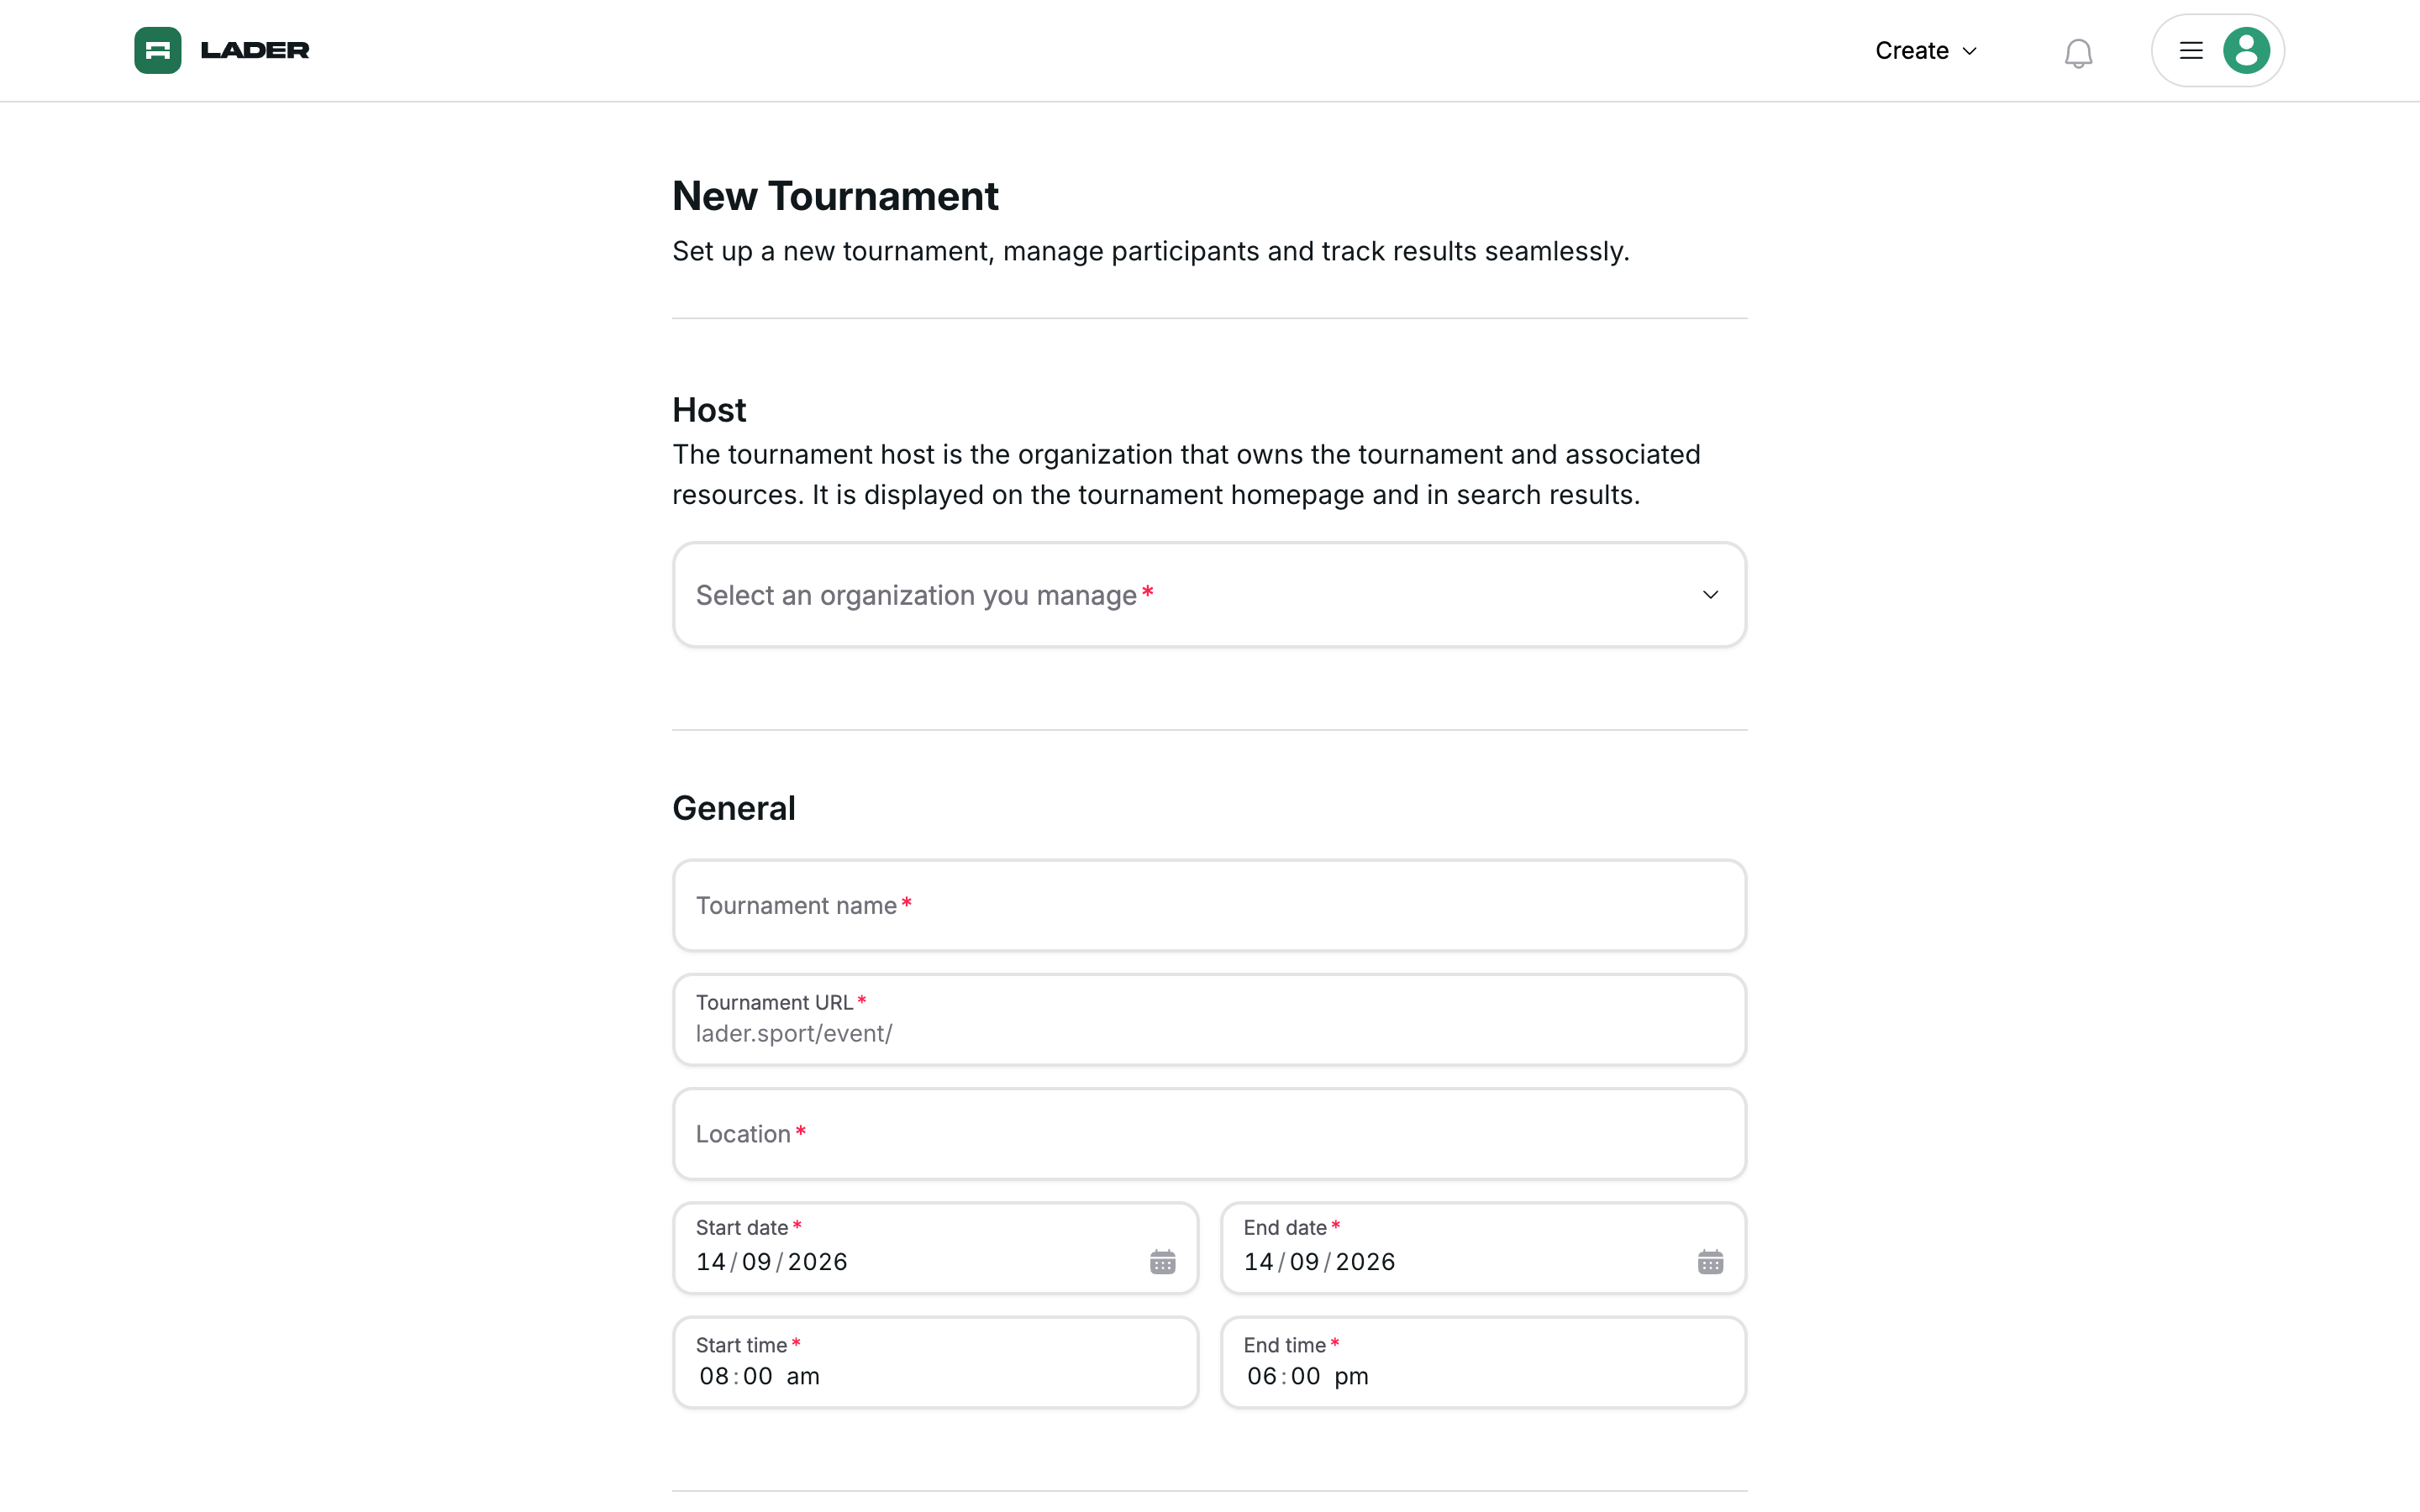
Click Create in the top bar and choose Tournament. If you haven't created an organization yet, the event options are locked and the menu asks you to start with an organization.
On the New Tournament form:
- Host: choose the organization that owns the tournament (Select an organization you manage).
- General: Tournament name, Tournament URL (your page's address,
lader.sport/event/<url>), Location, and the start and end dates and times. You can check and change the Time zone later, in Tournament Settings. - Medias and Description: optional thumbnail, cover image, and description.
- Contact: at least one email address is required (your account email is filled in for you). Contact details are shown publicly.
- Discoverability: Tournament is listed is on by default. A listed tournament appears in search results on LADER and on search engines. An unlisted tournament can still be viewed by anyone who has the link. You can change this later in Tournament Settings.
- Permissions: Players can submit scores for matches they play in is on by default.
Click Create Tournament. You land on your new tournament's page.
More help: what LADER sets up for you
- Every Super Admin and Administrator of the host organization becomes an Administrator of the tournament.
- Registrations start turned off.
2Add divisions
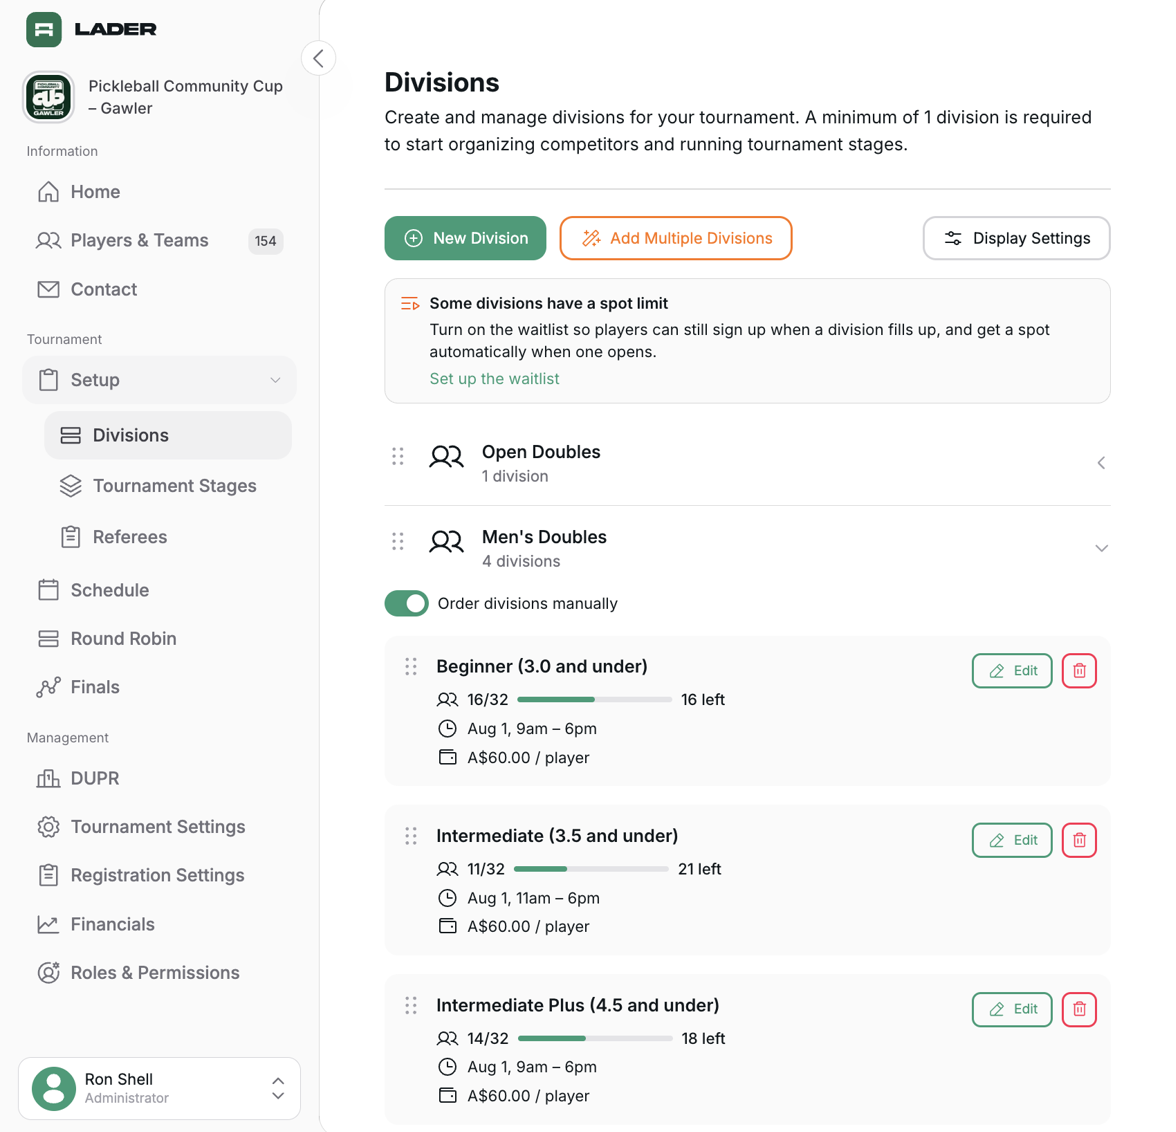
In the tournament sidebar, open Setup → Divisions. Click New Division to add one, or Add Multiple Divisions to create several at once.
For each division you set:
- Division type: Doubles, Singles or Team.
- Gender.
- Skill level: enter at least one of a minimum, a maximum or a custom name.
- Spots available: a Limit on entries. Leave it empty for unlimited.
- Optionally an age group, start and end times, and a description.
If you turn on Enforce DUPR rating ranges under Registration Settings → DUPR, singles and doubles divisions also get a Restrict registration by DUPR rating section.
More help: team divisions and registration
Players can only register themselves for singles and doubles divisions. Team divisions can't be self-registered, so you enter teams yourself: open Players & Teams, click Add Player/Team, and choose Team. Plan team events with this in mind.
3Set up registration
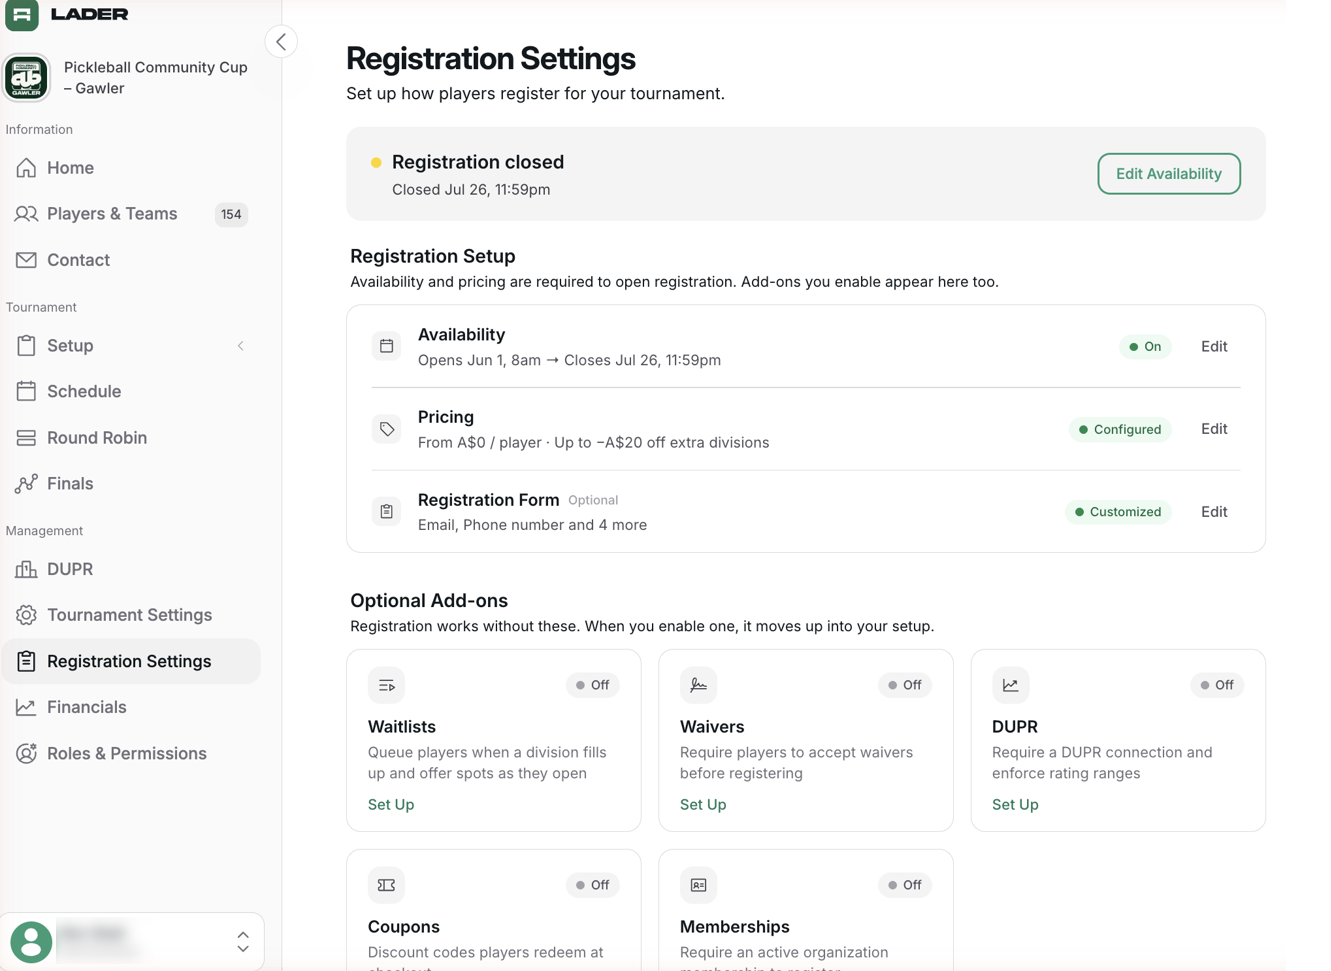
Open Registration Settings (under Management in the sidebar). The page has three parts:
- A status banner. It tells you whether you're accepting registrations and, if not, what's blocking it, with a button to fix it. On a new tournament it reads Not accepting registrations: "2 required steps left — set your pricing and turn registrations on." Click Start Setup to go to Availability.
- Registration Setup. Availability and Pricing are always listed here, plus any add-ons you've turned on, each with a short summary and status.
- Optional Add-ons. Extra features you haven't turned on yet, each shown as Off with a Set Up button. When you turn one on, it moves up into Registration Setup.
Two sections are required to open registration:
- Availability: when registration opens and closes, plus the Enable Registrations switch (see step 5). The dates are pre-filled: by default registration opens today at 8:00 am and closes at 6:00 pm the day before the tournament starts. Check them.
- Pricing: the currency, the Registration Fee Per Division, any Set Fee for Specific Divisions overrides, and early bird and multi-division discounts. Until you save pricing, registration can't open. This applies to free events too: set the fee to 0. See Set up pricing, payments and fees.
Everything else is optional:
- Registration Form: the questions players answer when they register. New tournaments start with a default form (email, phone number and date of birth), so it already appears in Registration Setup with a Default form chip. Players' previous answers to the same question are pre-filled.
- Waitlists: queue players when a division fills up, and offer spots as they open. See Set up waitlists.
- Waivers: players must accept your waivers before their registration is complete. See Require waivers.
- DUPR: require players to connect DUPR, and optionally enforce rating ranges per division.
- Coupons: discount codes that players enter at checkout, and whether your organization's coupons work at this tournament.
- Memberships: require an active membership to register. Players can get the membership as part of registering.
More help: changing settings after registration opens
Each entry keeps the price it was registered at. Pricing changes only affect new registrations, and nobody is charged again or refunded automatically.
Some changes can make complete registrations Registration incomplete: adding a required form question, a waiver, a membership requirement, or the DUPR connection requirement. Players who don't already meet the new requirement are emailed and asked to complete it. Add requirements sparingly once registration is live.
4Assign roles (optional)
Under Management → Roles & Permissions, you can give other people access to the tournament:
- Administrator: can view and edit everything, and can assign roles.
- Moderator: can edit participants, divisions, stages and matches.
- Scorekeeper: can report scores for any match.
Referees are added separately, under Setup → Referees.
5Turn on registrations
Go to Registration Settings → Availability. Once pricing is saved, the status banner reads Registrations disabled and its Enable Registrations button takes you there too. Turn on the Enable Registrations switch; it saves straight away. Confirm the Registration Period dates, and click Save Changes if you change them.
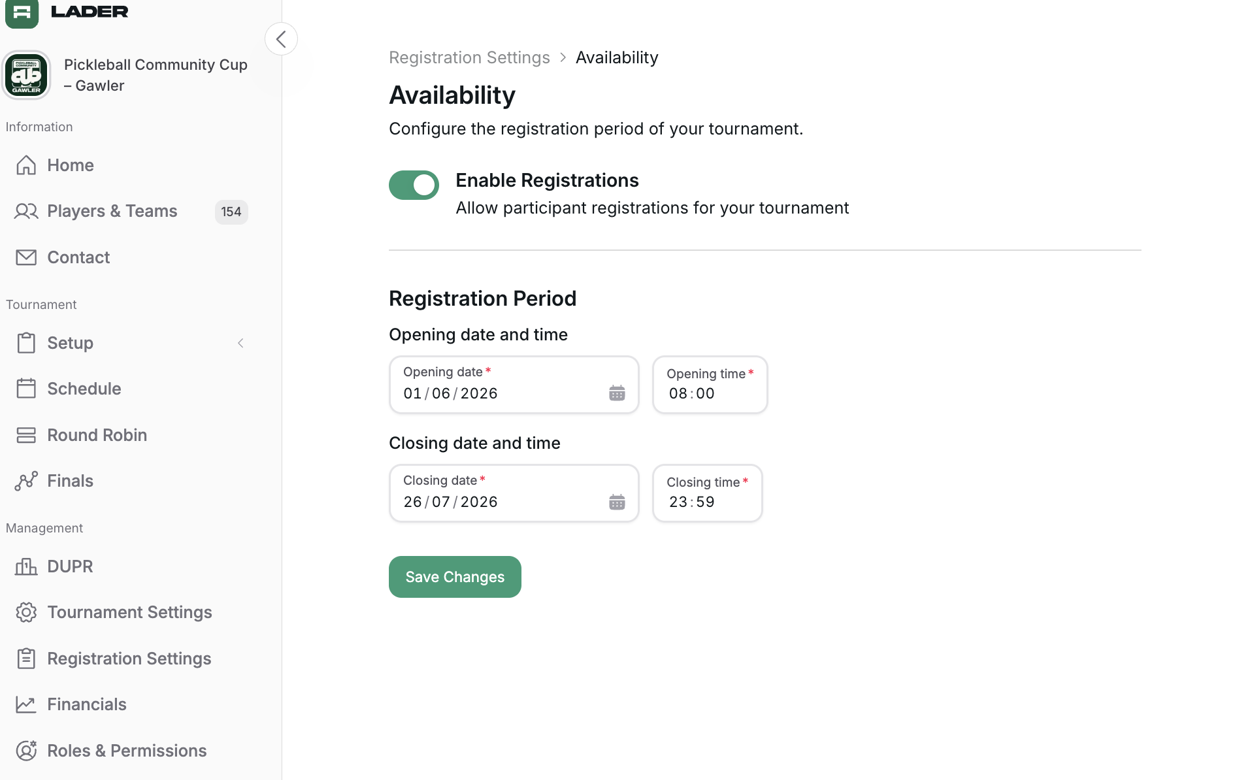
Registration is open only when all of these are true:
- Enable Registrations is on.
- The current time is between the opening and closing dates.
- Your organization's payment account is connected and payments are enabled.
- Pricing has been saved.
When everything is in place, the status banner reads Accepting registrations, or Registration opens with the date if the opening date is still ahead.
More help: the switch is greyed out
If your organization hasn't connected a payment account, the Enable Registrations switch is disabled. A message with a Set Up Payment Account button appears below it. If you aren't a Super Admin, ask one to connect the account.
If an account is connected but Stripe still needs more information, you can turn the switch on. Registrations open automatically once the Stripe requirements are resolved.
The Register button only appears on the tournament page after you turn on Enable Registrations. Before the opening date it reads Register Soon, and after the closing date it reads Registration Closed. In both cases it can't be clicked. Register Now is also greyed out while pricing or the payment account is missing.